
Luminaire Define - Attributes Section
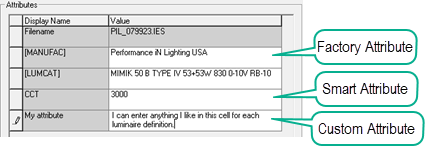
AGi32 provides the ability to attach additional descriptive information to your project beyond the usual Description and Tag fields supplied in the General Section. This is handled in the Attribute Section of the Define dialog. Attributes can be scheduled or can simply exist as part of the luminaire definition for reference. Attributes are job-file-specific, different Attributes can exist in different job files.
An Attribute can be textural information you enter manually, or it can draw information from the IES file, an outside web resource (URL), or from the calculated Metrics in the Metrics Section. There are several factory supplied Attributes you can use as you wish. They are enabled from the System Settings dialog and are enclosed in <>.
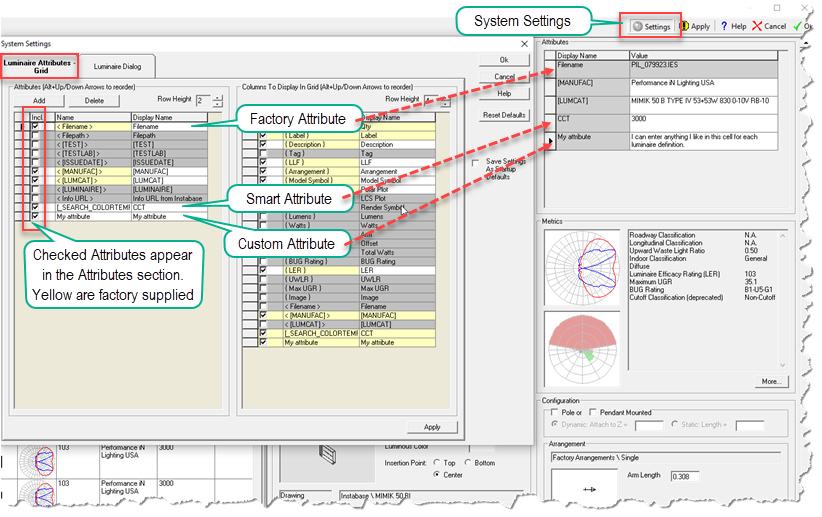
All Attribute creation and usage is enabled in the System Settings dialog.
Open the System Settings dialog and select the Luminaire Attributes and Grid tab. The Attributes are listed on the left side of the dialog. All checked Attributes will appear in the main Define dialog for your use. You can add your own Attributes using the Add button, and remove them using the Delete button.
Using Factory Attributes
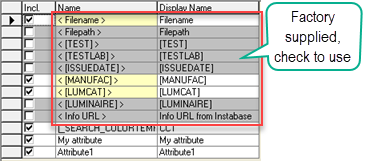
Factory Attributes are shown in the System Settings Attribute list enclosed by <>. When selected they are highlighted in yellow. Some Attributes are locked and others can be modified to meet your needs as described below.
- The following Keyword Attributes are enabled by default: < [MANUFAC] > and < [LUMCAT] >
- Locked factory Attributes are: < {TEST] >, < {TESTLAB] >, < [ISSUEDATE] >
- Name - Locked, cannot be changed
- Display Name - Can be changed
- Value (in Define Luminaire) - Locked, cannot be changed
- Unlocked factory Attributes are: < {MANUFAC] >, < {LUMCAT] > and < [LUMINAIRE] >
- Name - Locked, cannot be changed
- Display Name - Can be changed
- Value (in Define Luminaire) - Can be changed
- The <Info URL> provides the manufacturers product page link for Instabase files (if exists).
Create a Custom Attribute
Custom Attributes are textual entries where you can manually enter text for a luminaire definition.
- Click the Add button to create a new attribute. It appears at the bottom of the list (you can move Attributes up and down the list by selecting and using Alt-up arrow or down arrow).
- The Attribute Name is how the software will reference the new Attribute, change it if you like.
- The Attribute Display Name is how the Attribute will appear in the Define dialog and Schedules, enter your desired Display Name.
- User Attributes cannot contain <>'s or { }'s
- You can copy and paste into editable cells.
- Check the box to include the new Attribute in the Attributes section of the main Define dialog.
- Check the new Attribute on the Grid side if you want it to appear in the grid.
- Transportability: Attributes in job file are automatically added to Attributes list and added to Grid columns if enabled.

Create a Smart Attribute
A Smart Attribute can retrieve information from an IES file keyword (other than factory above) or display hyperlinks from a URL.
Attributes allow you to change/add characteristics (Keywords) in a photometric file (Keyword values) without having to edit the photometric file.
- Click the Add button to create a new attribute. It appears at the bottom of the list (you can move Attributes up and down the list by selecting and using Alt-up arrow or down arrow).
- In the Name field enter the keyword in the IES file or the URL (must begin with https:// or http://). Open the URL in your browser using Ctrl + Click.
- In the Display Name use you own verbiage as you wish for the Attribute to be called in the Define dialog and schedules.
- User Attributes cannot contain <>'s or { }'s
- You can copy and paste into editable cells.
- Check the box to include the new Attribute in the Attributes section of the main Define dialog.
- Check the new Attribute on the Grid side if you want it to appear in the grid.
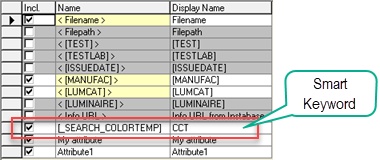
Example: Add the search keyword for CCT.
- Click the Add button to create a new attribute.
- In the Display Name field enter: [_SEARCH_COLORTEMP] (this is the custom search keyword from Instabase that manufacturers can include in their IES files with CCT value)
- In the Name field enter your verbiage, we used simply CCT (below).
- Check the boxes desired (Attribute list and Grid)
When using Smart Keywords in the main Define dialog you will find not all files have a response to things like our example. You can enter a response for these files as necessary.
File compatability
- When opening a file with Attributes in a legacy version of AGi32 you may lose attributes IF the luminaire definition is modified. This means you would have to redo your work if reopened in the current version where originally saved.
- There is no Attribute display in legacy versions.
- Schedules with attributes will be blank.